Managing emails can quickly become overwhelming — especially when your inbox is full of repetitive questions, promotional emails, and messages that don’t need your immediate attention.
In this guide, you’ll learn how to build an AI-powered email assistant using n8n and OpenAI that can:
- Read incoming emails automatically
- Decide whether an email should be answered, deleted, or left unread
- Draft and send replies using AI
- Use memory and a knowledge base for smarter responses
- Safely avoid replying to emails that require human judgment
This workflow is designed to save time without losing control.
What This AI Email Automation Can Do
Before we dive into the setup, here’s what the automation does at a high level:
- Monitors your Gmail inbox
- Extracts key email details (sender, subject, body)
- Uses AI to classify the email
- Automatically:
- Replies to emails it can confidently answer
- Deletes obvious promotional or spam emails
- Leaves complex or sensitive emails unread for manual review
This is not a “reply to everything” bot — it’s a controlled, intelligent assistant.
Tools & Requirements
To follow this guide, you’ll need:
- An active n8n instance (self-hosted or cloud)
- A Gmail account connected to n8n
- An OpenAI API key
- Basic familiarity with n8n nodes (no coding required)
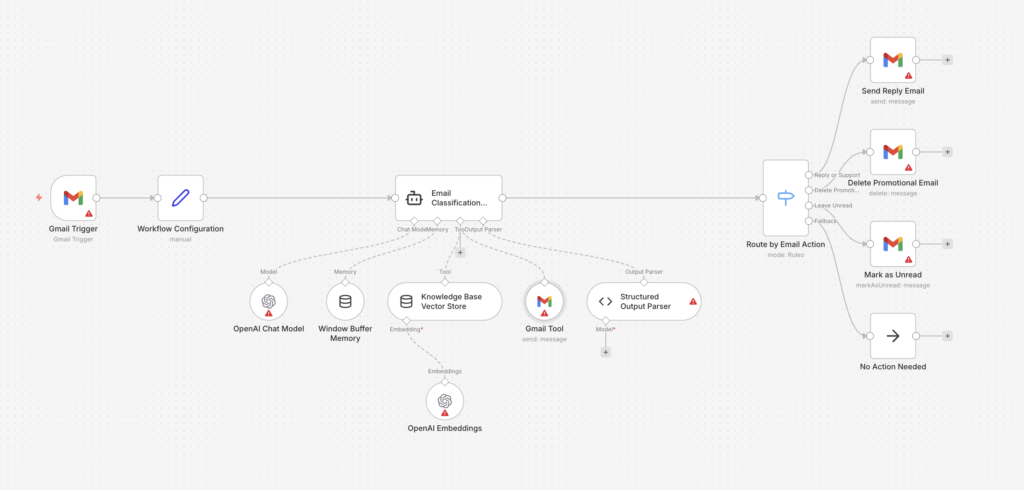
Workflow Architecture Overview
Here’s how the automation works step by step:
- Gmail Trigger – Detects new incoming emails
- Workflow Configuration (Set Node) – Standardizes email data
- AI Email Classification Agent – Decides what to do with the email
- Memory & Knowledge Base – Helps AI give better responses
- Structured Output Parser – Forces reliable AI decisions
- Switch Node – Routes emails based on AI decision
- Gmail Actions – Reply, delete, or mark as unread
Each step is explained in detail below.
Step 1: Set Up the Gmail Trigger
Start by adding a Gmail Trigger node.
Configuration:
- Trigger on: New Emails
- Polling interval: Every minute (or adjust as needed)
This node listens for new emails arriving in your inbox.
Step 2: Normalize Email Data (Set Node)
Add a Set node after the Gmail Trigger.
Create the following fields:
emailSubject→ Email subjectemailBody→ Plain text or HTML bodyemailFrom→ Sender’s email addressemailId→ Gmail message IDthreadId→ Gmail thread ID
This step ensures all downstream nodes receive clean, consistent data.
Step 3: Add the AI Email Classification Agent
This is the core intelligence of the workflow.
Add an AI Agent (LangChain Agent) node and configure it with a system prompt similar to:
You are an intelligent email classification assistant.
Classify each email into one of the following:
- answer
- delete
- leave_unread
The AI’s responsibilities:
- Understand the intent of the email
- Decide whether it can be answered safely
- Draft a professional reply if needed
- Avoid replying to sensitive or unclear emails
This step is what makes the automation smart, not risky.
Step 4: Connect the OpenAI Chat Model
Add an OpenAI Chat Model node and connect it to the agent.
Recommended settings:
- Model: GPT-4 / GPT-4o
- Temperature: 0.6 – 0.7 (balanced creativity and control)
This model powers the reasoning and response generation.
Step 5: Add Conversation Memory
Attach a Window Buffer Memory node to the agent.
Why this matters:
- Allows the AI to remember recent interactions
- Prevents repetitive or contradictory responses
- Improves email thread continuity
This is especially useful for ongoing conversations.
Step 6: Add a Knowledge Base (Vector Store)
Add a Vector Store with OpenAI Embeddings.
Use this to store:
- FAQs
- Product or service information
- Support documentation
The AI can now search your knowledge base before replying, making responses more accurate and consistent.
Step 7: Enforce Structured AI Output
Add a Structured Output Parser node.
Force the AI to return data in this format:
action: answer | delete | leave_unreadresponse: email reply (only if action = answer)reasoning: short explanation for the decision
This step is critical for safety and reliability.
Step 8: Route Emails Using a Switch Node
Add a Switch node based on the action field.
Create three routes:
Route 1: Answer
- Sends an email reply using Gmail
- Uses:
- Original sender
- “Re:” subject
- AI-generated response
Route 2: Delete
- Deletes promotional or spam emails automatically
Route 3: Leave Unread
- Marks the email as unread
- Keeps it for manual review
Optional: Add a No-Op node as a fallback.
Step 9: Test the Workflow
Before activating:
- Send test emails:
- A support question
- A promotional email
- A complex or sensitive email
- Verify:
- Replies are professional
- Spam gets deleted
- Important emails are left untouched
Once verified, activate the workflow.
Why This Approach Is Safe and Scalable
This automation is designed with guardrails, not blind automation:
- AI must justify its action
- Structured outputs prevent hallucinations
- Emails needing judgment are never auto-replied
- Easy to expand with more rules or data sources
This makes it suitable for:
- Business inboxes
- Support teams
- Founders and consultants
- High-volume email users